Configuring ASP.Net Identity OAuth login providers for multi-tenancy
Say for example you have a CMS :) You want to give full control to the developer to manage how their front-end members with authenticate, which could of course include ASP.Net Identity OAuth login providers. At the same time you want to easily allow your CMS to be configured so that ASP.Net Identity OAuth providers can be used for logging into the back office. In this scenario, the same OAuth provider might be used for both front-end and back-office authentication but authenticated under 2 different OAuth accounts. Another example might be if you have multi-tenancy set up for your front-end site and perhaps you want to use the same OAuth login provider but have members authenticate with different OAuth accounts for different domain names.
The defaults
As an example, lets assume that front-end members are configured to authenticate with the ASP.Net Identity Google OAuth2 provider. This is easily done by just following one of the many tutorials out there. Your startup code might look like:
app.UseCookieAuthentication(new CookieAuthenticationOptions ....

app.UseExternalSignInCookie();

app.UseGoogleAuthentication(
              clientId: "123456789...",
              clientSecret: "987654321....");
Great, but I need 2 (or more) Google OAuth2 providers, so what now? I can’t just add 2 declarations of:
app.UseGoogleAuthentication(
              clientId: "123456789...",
              clientSecret: "987654321....");

app.UseGoogleAuthentication(
              clientId: "abcdef...",
              clientSecret: "zyxwv....");
you’ll quickly realize that doesn’t work and only one provider instance will actually be used. This is because of the default underlying settings that get used to instantiate the Google provider. Let’s have a look at what the default options are in this case. The above code is equivalent to this:
app.UseGoogleAuthentication(new GoogleOAuth2AuthenticationOptions
{
    AuthenticationType = "Google",
    ClientId = "123456789...",
    ClientSecret = "987654321....",
    Caption = "Google",
    CallbackPath = new PathString("/signin-google"),
    AuthenticationMode = AuthenticationMode.Passive,
    SignInAsAuthenticationType = app.GetDefaultSignInAsAuthenticationType(),
    BackchannelTimeout = TimeSpan.FromSeconds(60),
    BackchannelHttpHandler = new System.Net.Http.WebRequestHandler(),
    BackchannelCertificateValidator = null,
    Provider = new GoogleOAuth2AuthenticationProvider()
});
The AuthenticationType
One very important aspect of the default settings is the AuthenticationType. This is a unique identifier for the provider instance and this is one of the reasons why if you have 2 x UseGoogleAuthentication declarations with the defaults only one will ever be used.
Knowing this, it’s clear that each declaration of UseGoogleAuthentication needs to specify custom options and have the AuthenticationType unique amongst them. So we might end up with something like:
//keep defaults for front-end
app.UseGoogleAuthentication(
    clientId: "123456789...",
    clientSecret: "987654321....");

//custom options for back-office
app.UseGoogleAuthentication(new GoogleOAuth2AuthenticationOptions
{
    AuthenticationType = "GoogleBackOffice",
    ClientId = "abcdef...",
    ClientSecret = "zyxwv...."
});
If you test this now, you’ll find out that only the first declaration is actually working even when you explicitly tell IOwinContext.Authentication.Challenge to use the “GoogleBackOffice” provider.
The CallbackPath
The reason that the default (first) declaration is the one that activates is because the response from Google is sending the request to the path: “/signin-google”, which is the default. The GoogleAuthenticationMiddleware will delegate to the GoogleAuthenticationHandler for each request and inspect the request to see if it should execute. For this logic it checks:
if (Options.CallbackPath.HasValue && Options.CallbackPath == Request.Path)
{
     //If the path matches, auth the request...
}
Since the CallbackPath will be the same by default on both above declarations, the first one that is registered will match and the other registered authenticators will be ignored. To fix this we’ll need to update the path that Google sends back and then update the second declaration to match that path.
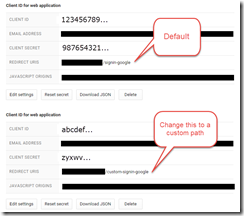
To tell Google to send the request back on a different path, in your Google Developers Console change the REDIRECT URIS value for the second provider:
Then we need to update the 2nd declaration with the custom CallbackPath so that it matches and activates properly:
app.UseGoogleAuthentication(new GoogleOAuth2AuthenticationOptions
{
    AuthenticationType = "GoogleBackOffice",
    ClientId = "abcdef...",
    ClientSecret = "zyxwv....",
    CallbackPath = new PathString("/custom-signin-google")
});
Hooray, now it should work!
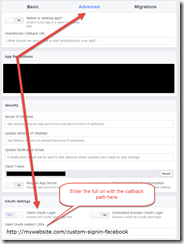
This concept is the same for most external login providers. For example for the Facebook one the default value is “/signin-facebook”, you’d need to configure Facebook’s “Valid OAuth redirect URIs” property with the correct callback path in Facebook’s developer portal:
What is SignInAsAuthenticationType?
The last thing to point out is that by default the SignInAsAuthenticationType for each provider will resolve to: app.GetDefaultSignInAsAuthenticationType(), which by default is: DefaultAuthenticationTypes.ExternalCookie = “ExternalCookie”. Each OAuth provider is linked to another middleware that is responsible for actually issuing a user’s ClaimsIdentity, so by default this will be “ExternalCookie”. In some cases you won’t want the default external cookie authentication middleware to assign the ClaimsIdentity for your OAuth provider, you might need to issue a different ClaimsIdentity or just have more granular control over what happens with the callback for each OAuth provider. In this case you’ll need to specify another custom cookie authentication declaration, for example:
app.UseCookieAuthentication(new CookieAuthenticationOptions
{
    AuthenticationType = "CustomExternal",
    AuthenticationMode = AuthenticationMode.Passive,
    CookieName = "MyAwesomeCookie",
    ExpireTimeSpan = TimeSpan.FromMinutes(5),
    //Additional custom cookie options....
});
And then you can link that up to your OAuth declaration like:
//custom options for back-office
app.UseGoogleAuthentication(new GoogleOAuth2AuthenticationOptions
{
    AuthenticationType = "GoogleBackOffice",
    ClientId = "abcdef...",
    ClientSecret = "zyxwv....",
    SignInAsAuthenticationType = "CustomExternal"
});

