Deploying to Azure from VSTS using publish profiles and msdeploy

In almost all of the examples online about how to deploy various services to Azure, they always list the super easy way to do it and that is to authenticate your current account to your Azure subscription which then grants your VSTS build to do all sorts of things… The problem is that not everyone has the security clearance to use the super easy tools in VSTS.
When you attempt to use these nice tools in VSTS you might get an error like this: “Failed to set Azure permission ‘RoleAssignmentId: some-guid-goes-here’ for the service principal … does not have authorizationto perform action ‘Microsoft.Authorization/roleAssignments/write’ over scope” This is because these nice VSTS tools actually creates a custom user behind the scenes in your azure subscription to use but your account doesn’t have access to authorize that.
Luckily there’s a work around
MS Deploy … sigh
Maybe there are other work arounds but this works, however it’s not the most elegant. I thought I’d post my findings here because it was a bit of a pain in the ass to get this all correct.
So here’s the steps:
1. Download the publish profile
You need to get the publish profile from your app service that you want to deploy to. This can be a website, a staging slot, an Azure function, (probably a bunch of others)
The file downloaded is an XML file containing a bunch of info you’ll need
2. Create a release definition and environment for your deployment
This assumes that you are pretty familiar with VSTS
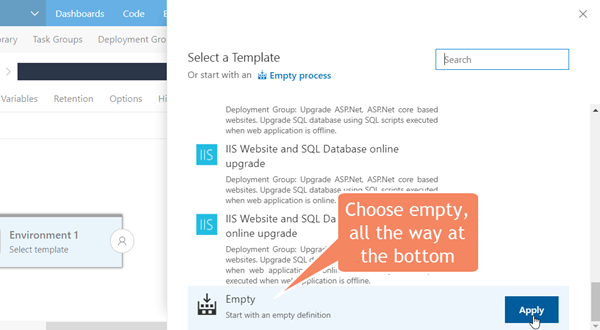
You’ll want to create an empty environment in your release definition. Normally this is where you could choose the built in fancy VSTS deployment templates like “Azure App Service Deployment” … but as above, this doesn’t work if you don’t have security clearance. Instead, choose ‘Empty’
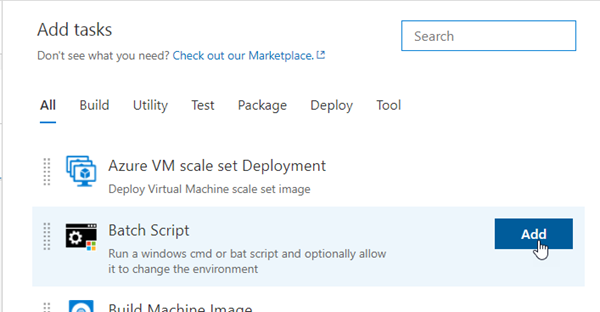
Then in your environment tasks, add Batch Script
3. Setup your batch script
There’s 2 ways to go about this and both depend on a msdeploy build output. This build output is generated by your build in VSTS if you are using a standard VSTS Visual Studio solution build. This will create msdeploy packages for you and will have put them in your artifacts folder. Along with msdeploy packages this will also generate a cmd batch file that executes msdeploy and a readme file to tell you how to execute it which contains some important info that you should read.
So here’s 2 options: Execute the cmd file, or execute msdeploy.exe directly
Execute the cmd file
There’s a bit of documentation about this online but most of it is based on using the SetParameters.xml file to adjust settings… but i just don’t want to use that.
Here’s the Path and Arguments that you need to run:
$(System.DefaultWorkingDirectory)/YOUR_BUILD_NAME/drop/YOUR_MSBUILD_PACKAGE.deploy.cmd/y "/m:https://${publishUrl}/MSDeploy.axd?site=${msdeploySite}" /u:$(userName) /p:$(userPWD) /a:Basic -enableRule:DoNotDeleteRule "-setParam:name='IIS Web Application Name',value='${msdeploySite}'"
The parameters should be added to your VSTS Variables: ${msdeploySite}, $(userName), $(userPWD) and these variables correspond exactly to what is in your publish profile XML file that you downloaded. These parameters need to be pretty much exact, any misplaced quote or if you don’t include https, etc… will cause this to fail.
Important: the use of -enableRule:DoNotDeleteRule is totally optional, if you want to reset your site to exactly what is in the msdeploy package you do not want this. If however, you have user generated images, content or custom config files that exist on your site and you don’t want them deleted when you deploy, then you need to set this.
I’m unsure if this will work for Azure Functions deployment (it might!) … but I used the next option to do that:
Execute msdeploy.exe directly
If you execute the CMD file, you’ll see in the VSTS logs the exact msdeploy signature used which is:
"C:\Program Files\IIS\Microsoft Web Deploy V3\msdeploy.exe" -source:package='d:\a\r1\a\YOUR_PROJECT_NAME\drop\YOUR_MSDEPLOY_PACKAGE_FILE.zip' -dest:auto,computerName="https://YOUR_PUBLISH_URL/MSDeploy.axd?site=YOUR_PROFILE_NAME",userName=********,password=********,authtype="Basic",includeAcls="False" -verb:sync -disableLink:AppPoolExtension -disableLink:ContentExtension -disableLink:CertificateExtension -setParamFile:"d:\a\r1\a\YOUR_PROJECT_NAME\drop\YOUR_MSDEPLOY_PACKAGE_FILE.SetParameters.xml" -enableRule:DoNotDeleteRule -setParam:name='IIS Web Application Name',value='YOUR_PROFILE_NAME'So if you wanted, you could take this and execute that directly instead of the CMD file. I use this method to deploy Azure Functions but the script is a little simpler since that deployment doesn’t require all of these parameters. For that I use this for the Path and Arguments:
C:\Program Files\IIS\Microsoft Web Deploy V3\msdeploy.exe-verb:sync -source:package='$(System.DefaultWorkingDirectory)/YOUR_BUILD_NAME/drop/YOUR_MSDEPLOY_PACKAGE.zip' -dest:auto,computerName="https://$(publishUrl)/msdeploy.axd?site=$(msdeploySite)",UserName='$(userName)',Password='$(userPWD)',AuthType='Basic' -setParam:name='IIS Web Application Name',value='$(msdeploySite)'Hopefully this comes in handy for someone ![]()


